EKS 클러스터 구축 및 Kubeflow 설치
[참조] https://github.com/aws-samples/amazon-efs-developer-zone/tree/main/application-integration/container/eks
AWS Cloud9
AWS Cloud9 환경 생성
이름 지정, Instance 타입 t3.small 또는 m5.large 선택 후 나머지 default로 설정 후 생성한다.
Cloud9 실행
+ 버튼에서 New Terminal 클릭
디스크 사이즈 변경
pip3 install --user --upgrade boto3
export instance_id=$(curl -s http://169.254.169.254/latest/meta-data/instance-id)
python -c "import boto3
import os
from botocore.exceptions import ClientError
ec2 = boto3.client('ec2')
volume_info = ec2.describe_volumes(
    Filters=[
        {
            'Name': 'attachment.instance-id',
            'Values': [
                os.getenv('instance_id')
            ]
        }
    ]
)
volume_id = volume_info['Volumes'][0]['VolumeId']
try:
    resize = ec2.modify_volume(
            VolumeId=volume_id,
            Size=30
    )
    print(resize)
except ClientError as e:
    if e.response['Error']['Code'] == 'InvalidParameterValue':
        print('ERROR MESSAGE: {}'.format(e))"
if [ $? -eq 0 ]; then
    sudo reboot
fi
디스크 사이즈 확인
df -h
30G로 사이즈가 늘어난 것을 알 수 있다.
만약 aws 자격 증명 관련 에러가 난다면 EC2 역할에 AmazonEC2FullAccess 권한을 추가해준다.
쿠버네티스 설치
kubectl 설치
sudo curl --silent --location -o /usr/local/bin/kubectl https://amazon-eks.s3.us-west-2.amazonaws.com/1.22.17/2023-03-17/bin/linux/amd64/kubectl
실행파일로 옵션 변경
sudo chmod +x /usr/local/bin/kubectl
awscli 업데이트
curl "https://awscli.amazonaws.com/awscli-exe-linux-x86_64.zip" -o "awscliv2.zip"
unzip awscliv2.zip
sudo ./aws/install
sudo mv /usr/local/bin/aws /usr/bin/aws
jq, envsubst, bash-completion 설치
sudo yum -y install jq gettext bash-completion moreutils
yq 설치
echo 'yq() {
  docker run --rm -i -v "${PWD}":/workdir mikefarah/yq "$@"
}' | tee -a ~/.bashrc && source ~/.bashrc
바이너리 파일이 경로에 잘 있는지 확인
for command in kubectl jq envsubst aws
do
  which $command &>/dev/null && echo "$command in path" || echo "$command NOT FOUND"
done
kubectl bash_completion 활성화
kubectl completion bash >>  ~/.bash_completion
. /etc/profile.d/bash_completion.sh
. ~/.bash_completion
AWS Load Balancer Controller 버전 설정
echo 'export LBC_VERSION="v2.3.0"' >>  ~/.bash_profile
.  ~/.bash_profile
IAM Role 설정
IAM Role 추가
AdministratorAccessRole 추가해서 생성EC2-인스턴스-작업-보안-IAM 역할 수정클릭
IAM settings 업데이트
aws cloud9 update-environment --environment-id $C9_PID --managed-credentials-action DISABLE
rm -vf ${HOME}/.aws/credentials
awscli 설정
export ACCOUNT_ID=$(aws sts get-caller-identity --output text --query Account)
export AWS_REGION=$(curl -s 169.254.169.254/latest/dynamic/instance-identity/document | jq -r '.region')
export AZS=($(aws ec2 describe-availability-zones --query 'AvailabilityZones[].ZoneName' --output text --region $AWS_REGION))
AWS Region 설정 확인
test -n "$AWS_REGION" && echo AWS_REGION is "$AWS_REGION" || echo AWS_REGION is not set
- 출력: AWS_REGION is ap-northeast-2
bash_profile에 저장
echo "export ACCOUNT_ID=${ACCOUNT_ID}" | tee -a ~/.bash_profile
echo "export AWS_REGION=${AWS_REGION}" | tee -a ~/.bash_profile
echo "export AZS=${AZS[@]}" | tee -a ~/.bash_profile
aws configure set default.region ${AWS_REGION}
aws configure get default.region
IAM Role 유효성 확인
aws sts get-caller-identity --query Arn \
    | grep <위에서 설정한 Role 이름> -q  && echo "IAM role valid" || echo "IAM role NOT valid"
EKS 클러스터 생성
CMK(Custom Managed Key) 생성
aws kms create-alias --alias-name alias/kubeflow --target-key-id $(aws kms create-key --query KeyMetadata.Arn --output text)
CMK는 EKS 클러스터에서 쿠버네티스 Secrets 암호화에 사용된다.
CMK의 ARN을 환경변수로 설정
export MASTER_ARN=$(aws kms describe-key --key-id alias/kubeflow --query KeyMetadata.Arn --output text)
echo "export MASTER_ARN=${MASTER_ARN}" | tee -a ~/.bash_profile
eksctl 바이너리 파일 다운로드
curl --silent --location "https://github.com/weaveworks/eksctl/releases/latest/download/eksctl_$(uname -s)_amd64.tar.gz" | tar xz -C /tmp
sudo mv -v /tmp/eksctl /usr/local/bin
eksctl 버전 확인
eksctl version
eksctl bash-completion 활성화
eksctl completion bash >> ~/.bash_completion
. /etc/profile.d/bash_completion.sh
. ~/.bash_completion
EKS 클러스터 생성 yaml 파일
---
apiVersion: eksctl.io/v1alpha5
kind: ClusterConfig

metadata:
  name: kfcluster
  region: ${AWS_REGION}
  version: "1.22"

availabilityZones: ["${AZS[0]}", "${AZS[1]}"]

managedNodeGroups:
- name: nodegroup
  minSize: 1
  desiredCapacity: 4
  maxSize: 10
  instanceType: m5.large
  ssh:
    enableSsm: true

# To enable all of the control plane logs, uncomment below:
# cloudWatch:
#  clusterLogging:
#    enableTypes: ["*"]

secretsEncryption:
  keyARN: ${MASTER_ARN}
${환경변수} 안에 내용들은 위에 환경변수로 설정한 값들을 넣으면 되고 다음과 같이 하면 바로 yaml 파일이 생성된다.
cat << EOF > kfcluster.yaml
<위 yaml 파일 내용>
EOF
클러스터 생성
eksctl create cluster -f kfcluster.yaml
클러스터 확인
kubectl get nodes
Role 이름 Export
STACK_NAME=$(eksctl get nodegroup --cluster kfcluster -o json | jq -r '.[].StackName')
ROLE_NAME=$(aws cloudformation describe-stack-resources --stack-name $STACK_NAME | jq -r '.StackResources[] | select(.ResourceType=="AWS::IAM::Role") | .PhysicalResourceId')
echo "export ROLE_NAME=${ROLE_NAME}" | tee -a ~/.bash_profile
EKS 콘솔 자격증명 가져오기
c9builder=$(aws cloud9 describe-environment-memberships --environment-id=$C9_PID | jq -r '.memberships[].userArn')
if echo ${c9builder} | grep -q user; then
    rolearn=${c9builder}
        echo Role ARN: ${rolearn}
elif echo ${c9builder} | grep -q assumed-role; then
        assumedrolename=$(echo ${c9builder} | awk -F/ '{print $(NF-1)}')
        rolearn=$(aws iam get-role --role-name ${assumedrolename} --query Role.Arn --output text)
        echo Role ARN: ${rolearn}
fi
ARN을 사용하여 클러스터 내에 ID 매핑 생성
eksctl create iamidentitymapping --cluster kfcluster --arn ${rolearn} --group system:masters --username admin
콘솔 자격 증명 관리자 추가
kubectl describe configmap -n kube-system aws-auth
Kubeflow 1.6 호환성 확인
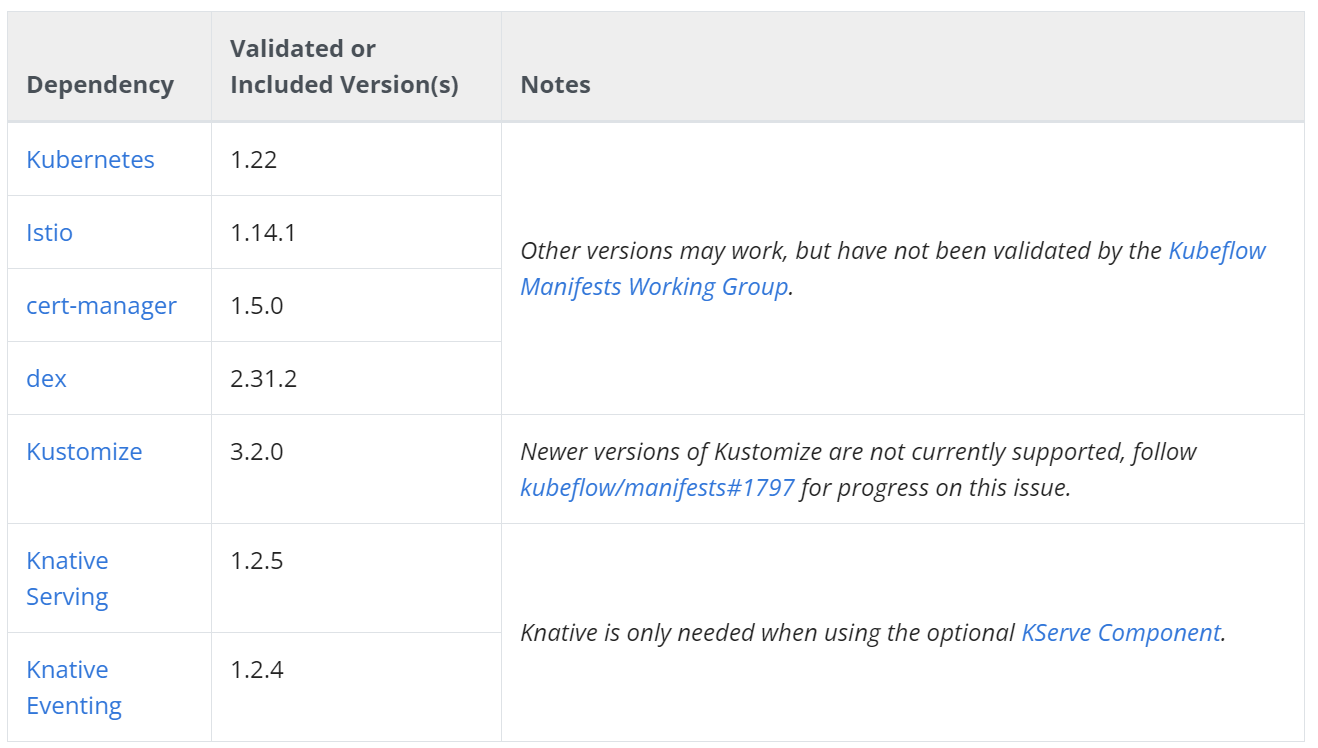
Kubeflow 1.6 컴포넌트 버전

Kubeflow 1.6 Dependency 버전
클러스터 세팅
필요 툴 확인
kubectl version
aws --version
jq --version
yq --version
클러스터 확인
kubectl get nodes
Kubeflow 설치
Kustomize 설치
wget https://github.com/kubernetes-sigs/kustomize/releases/download/v3.2.0/kustomize_3.2.0_darwin_amd64
chmod +x kustomize
sudo mv -v kustomize /usr/local/bin
Kustomize 실행 확인
kustomize version
Kubeflow 설치
git clone https://github.com/kubeflow/manifests.git
cd manifests
git checkout tags/v1.6.1
while ! kustomize build example | kubectl apply --validate=false -f -; do echo "Retrying to apply resources"; sleep 30; done
kubectl get pods -n cert-manager
kubectl get pods -n istio-system
kubectl get pods -n auth
kubectl get pods -n knative-eventing
kubectl get pods -n knative-serving
kubectl get pods -n kubeflow
kubectl get pods -n kubeflow-user-example-com
모든 파드의 상태가 Running인지 확인한다.
Kubeflow실행
Nodeport 설정
kubectl port-forward svc/istio-ingressgateway -n istio-system 8080:80
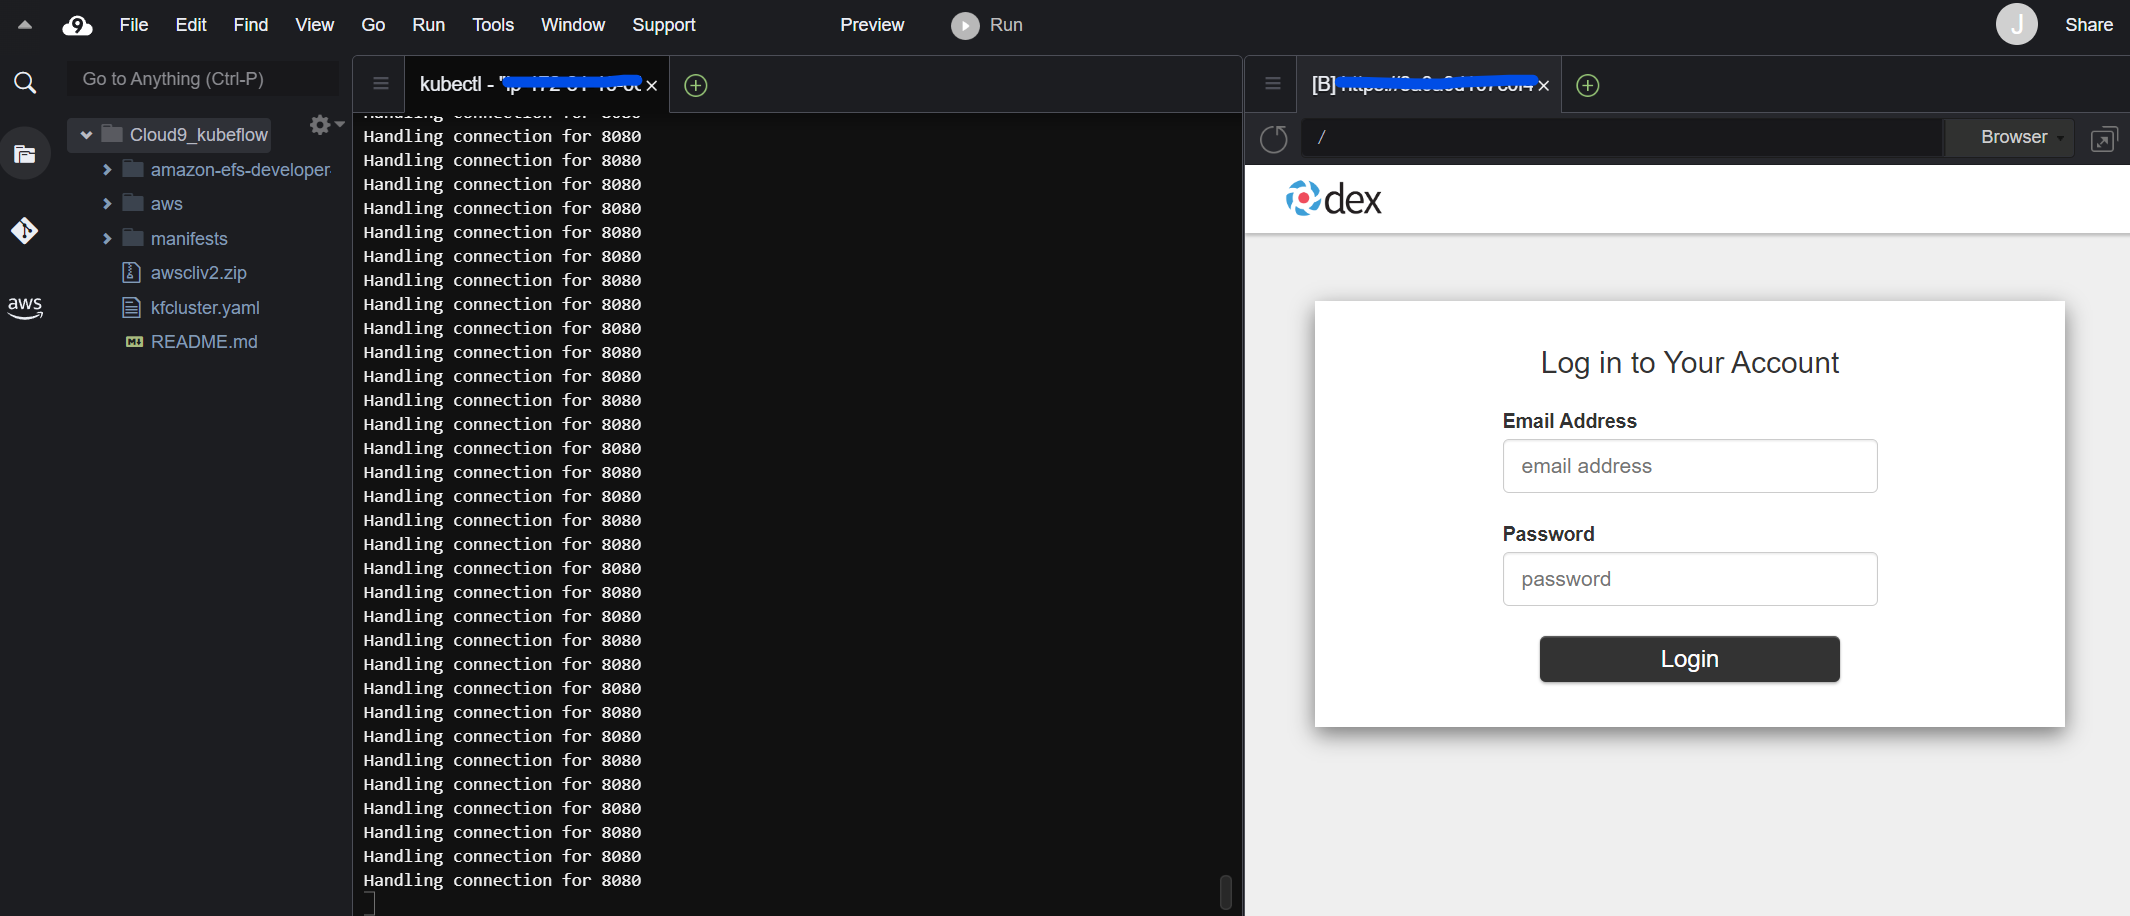
Preview > Preview Running Application을 클릭 후 오른쪽 화살표 그림 (Pop Out Into New Window) 버튼을 클릭
이후 다음 Default 정보로 로그인
- Email Address:
user@example.com - Password:
12341234
[참조]https://github.com/aws-samples/amazon-efs-developer-zone/tree/main/application-integration/container/eks
끝!