Kubeflow Pipeline
[참조] 패스트캠퍼스 - 머신러닝 서비스 구축을 위한 실전 MLOps
kfp 설치
pip install kfp
설치 확인
kfp --help
which dsl-compile
Kubeflow Pipeline 개념
Pipeline
- 여러 Component들을 연관성, 순서에 따라 연결지은 그래프(DAG)
- 쿠버네티스 관점에서 Workflow에 해당
kfpSDK를 사용해 파이프라인을 구현하고dsl compiler를 통해 쿠버네티스가 이해할 수 있는 yaml 파일로 생성하여 구현
Component
- 재사용 가능한 형태의 분리된 하나의 작업 단위
- 쿠버네티스 관점에서 파드에 해당
kfpSDK를 사용해 Component를 구현하면 workflow yaml 파일의spec.templates에 해당 컴포넌트를 감싼 부분이 추가가 됨
Kubeflow Pipeline 예제 1
from kfp.components import create_component_from_func

def add(value_1: int, value_2: int) -> int:
    ret = value_1 + value_2
    return ret


def subtract(value_1: int, value_2: int) -> int:
    ret = value_1 - value_2
    return ret


def multiply(value_1: int, value_2: int) -> int:
    ret = value_1 * value_2
    return ret

add_op = create_component_from_func(add)
subtract_op = create_component_from_func(subtract)
multiply_op = create_component_from_func(multiply)

from kfp.dsl import pipeline


@pipeline(name="add example")
def my_pipeline(value_1: int, value_2: int):
    task_1 = add_op(value_1, value_2)
    task_2 = subtract_op(value_1, value_2)
    task_3 = multiply_op(task_1.output, task_2.output)
컴파일
dsl-compile --py add.py --output add_pipeline.yaml
해당 파일을 Kubeflow > Pipelines > Upload pipeline에서 파일을 업로드 후 Runs > Create Run에서 실행
실행 결과
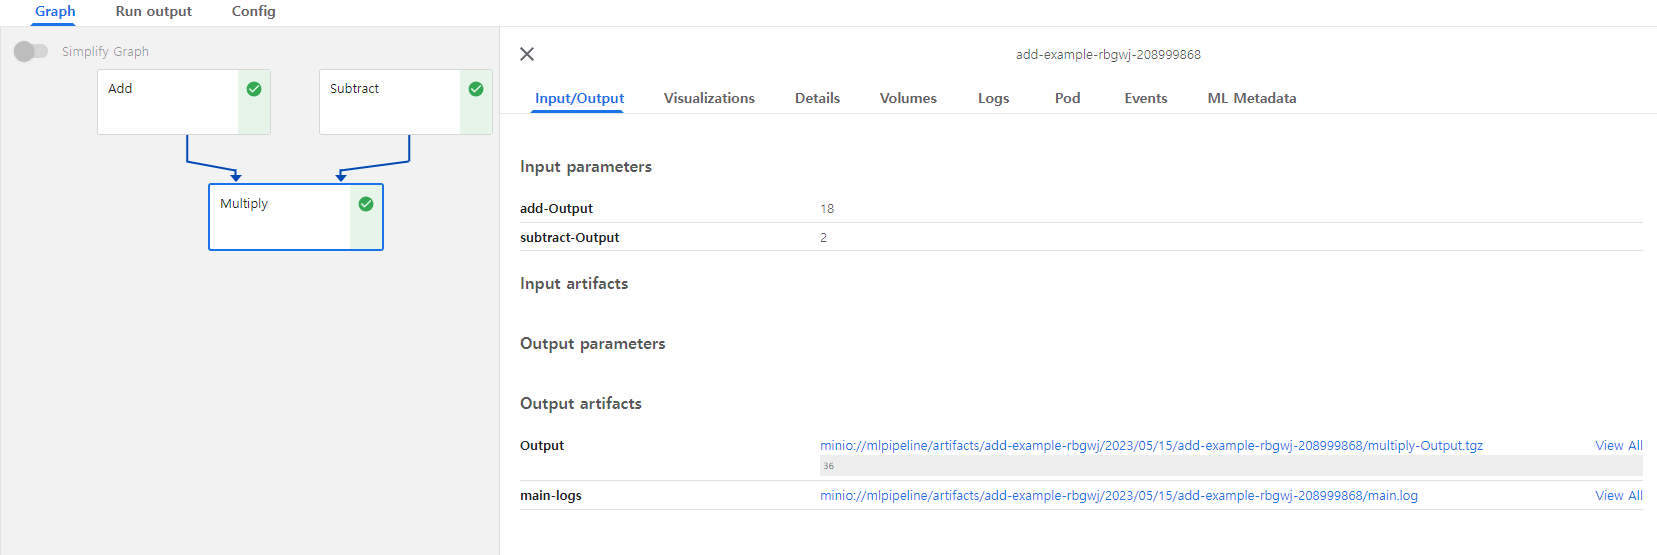
- 각 컴포넌트가 파드 형태로 동작
위 예제 코드에 다음 코드 부분을 더해준다.
if __name__ == "__main__":
    kfp.compiler.Compiler().compile(my_pipeline, "./add_pipeline_2.yaml")
코드 실행
python add.py
- 따로
dsl-compile명령어를 입력할 필요 없이 자동으로 결과 yaml 파일 생성 - 같은 결과 도출
Kubeflow Pipeline 예제 2
예제 1 처럼 컴포넌트에서 다른 컴포넌트로 데이터를 바로 전달해 줄수도 있지만 데이터가 큰 경우에는 다른 방법이 더 적절하다.
import kfp
from kfp.components import InputPath, OutputPath, create_component_from_func

@create_component_from_func
def write_file_op(
    data_output_path: OutputPath("dict")
):
    import json

    data = {
        "a": 300,
        "b": 10,
    }

    # file write to data_output_path
    with open(data_output_path, "w") as f:
        json.dump(data, f)


@create_component_from_func
def read_file_and_multiply_op(
    data_input_path: InputPath("dict")
) -> float:
    import json

    # file read to data_output_path
    with open(data_input_path, "r") as f:
        data = json.load(f)

    # multiply
    result = data["a"] * data["b"]
    print(f"Result: {result}")

    return result


@kfp.dsl.pipeline(name="Data Passing by File Example")
def data_passing_file_pipeline():
    write_file_task = write_file_op()
    _ = read_file_and_multiply_op(write_file_task.outputs["data_output"])


if __name__ == "__main__":
    kfp.compiler.Compiler().compile(
        data_passing_file_pipeline,
        "./data_passing_file_pipeline.yaml"
    )
- 첫 번째 컴포넌트에서 파일 저장
- 두 번쩨 컴포넌트에서는 데이터가 담긴 파일의 경로를 전달받아 실행
각 컴포넌트는 쿠버네티스의 파드 형태로 생성되기 때문에 필요한 리소스를 할당할 수가 있다.
- CPU, 메모리 할당
@dsl.pipeline() def pipeline(): ... training_task = training_op(learning_rate, num_layers, optimizer).set_cpu_request(2).set_cpu_limit(4).set_memory_request('1G').set_memory_limit('2G') ...- 메소드 체이닝 형태로 작성
- GPU도 설정 가능하지만 base 이미지에 cuda, cudnn, tensorflow-gpu 등 GPU 사용이 가능한 이미지가 사용되어야 함
- PVC
@dsl.pipeline() def pipeline(): ... vop = dsl.VolumeOp( name="v1", resource_name="mypvc", size="1Gi" ) use_volume_op = dsl.ContainerOp( name="test", ... pvolumes={"/mnt": vop.volume} # 이렇게 ContainerOp 생성 시, argument 로 지정 ) ...- 쿠버네티스 동일 네임스페이스에 PVC를 미리 생성 후 argument로 이름 지정하여 사용
이외에도 Secret 등 다양한 쿠버네티스 리소스 사용이 가능하며 추가 정보는 공식 문서를 확인하면 된다.
링크: https://kubeflow-pipelines.readthedocs.io/en/stable/_modules/kfp/dsl/_container_op.html
Kubeflow Pipeline 예제 3
import kfp
from kfp import dsl
from kfp.components import create_component_from_func


@create_component_from_func
def generate_random_op(minimum: int, maximum: int) -> int:
    import random

    result = random.randint(minimum, maximum)

    print(f"Random Integer is : {result}")
    return result


@create_component_from_func
def small_num_op(num: int):
    print(f"{num} is Small!")


@create_component_from_func
def large_num_op(num: int):
    print(f"{num} is Large!")


@dsl.pipeline(
    name='Conditional pipeline',
    description='Small or Large'
)
def conditional_pipeline():
    # generate_random_op 의 결과를 number 변수에 할당
    number = generate_random_op(0, 100).output

    # if number < 30, execute small_num_op
    with dsl.Condition(number < 30):
        small_num_op(number)
    # if number >= 30, execute large_num_op
    with dsl.Condition(number >= 30):
        large_num_op(number)


if __name__ == "__main__":
    kfp.compiler.Compiler().compile(
        conditional_pipeline,
        "./conditional_pipeline.yaml"
    )
- 첫 번째 컴포넌트에서 randon int를 Generate
- 조건에 따라 숫자가 큰지 결과 출력
import kfp
from kfp import dsl
from kfp.components import create_component_from_func


@create_component_from_func
def generate_random_list_op() -> list:
    import random

    total = random.randint(5, 10)
    result = [i for i in range(1, total)]

    return result


@create_component_from_func
def print_op(num: int):
    print(f"{num} is Generated!")


@dsl.pipeline(
    name='Parallel pipeline',
)
def parallel_pipeline():
    random_list = generate_random_list_op().output

    # ParallelFor 의 argument 로 [1,2,3] 과 같은 형태의 constant list 를 입력해도 되지만,
    # 이전 component 에서 random 하게 generate 한 list 를 넘겨주는 예시입니다.
    with dsl.ParallelFor(random_list) as item:
        print_op(item)


if __name__ == "__main__":
    kfp.compiler.Compiler().compile(
        parallel_pipeline,
        "./parallel_pipeline.yaml"
    )
- 랜덤 5~10 사이의 숫자 생성
- for문을 적용해서 숫자들이 생성되는 것을 병렬 처리
[참조]패스트캠퍼스 - 머신러닝 서비스 구축을 위한 실전 MLOps
끝!