Kokoa talk 클론 코딩 - 로그인 페이지
노마드코더 코코아톡 클론코딩 수강 중
Kokoa talk 클론 코딩 시작
index.html 파일 먼저 생성
html 파일에서 ! 입력 후 엔터를 입력해주면 자동으로 기본틀 완성된다.
<!DOCTYPE html>
<html lang="en">
  <head>
    <meta charset="UTF-8" />
    <meta http-equiv="X-UA-Compatible" content="IE=edge" />
    <meta name="viewport" content="width=device-width, initial-scale=1.0" />
    <title>Welcome to Kokoa Talk</title>
  </head>
  <body></body>
</html>
상태바 만들기
index.html
<!DOCTYPE html>
<html lang="en">
<head>
<meta charset="UTF-8" />
<meta http-equiv="X-UA-Compatible" content="IE=edge" />
<meta name="viewport" content="width=device-width, initial-scale=1.0" />
<title>Welcome to Kokoa Talk</title>
</head>
<body>
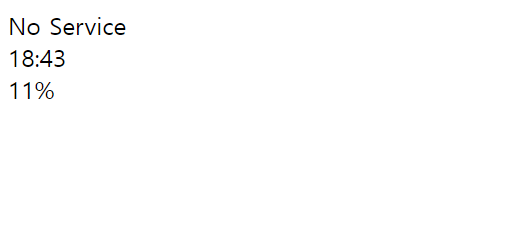
<div class="status-bar">
<div class="status-bar__column">
<span>No Service</span>
<!-- To DO: Wifi Icon -->
</div>
<div class="status-bar__column">
<span>18:43</span>
</div>
<div class="status-bar__column">
<span>11%</span>
<!-- Battery Icon -->
<!-- Lightning Icon -->
</div>
</div>
</body>
</html>
- 상태바는 3열로 나눔
div이름이나class이름은 길더라도 구분하기 쉽게 정하는 것이 좋음- 여기서는 BEM(Block Element Modifier) 규칙을 사용할 것
결과
Icon 추가
- Icon 참조 사이트 1: https://heroicons.dev/
원하는 아이콘을 클릭하면 링크가 복사되고 붙여넣기 하면 아래와 같이 경로가 복사됨
<svg class="w-6 h-6" fill="currentColor" viewBox="0 0 20 20" xmlns="http://www.w3.org/2000/svg"> <path d="M2 11a1 1 0 011-1h2a1 1 0 011 1v5a1 1 0 01-1 1H3a1 1 0 01-1-1v-5zM8 7a1 1 0 011-1h2a1 1 0 011 1v9a1 1 0 01-1 1H9a1 1 0 01-1-1V7zM14 4a1 1 0 011-1h2a1 1 0 011 1v12a1 1 0 01-1 1h-2a1 1 0 01-1-1V4z"></path> </svg>- Icon 참조 사이트 2: https://fontawesome.com/
아래와 같이 스크립트 링크를 코드에 복사해서 사용할 수 있으며 위치는 항상 마지막이어야 함
<body> ... <script src="https://kit.fontawesome.com/340f2fb345.js" crossorigin="anonymous"></script> </body>- 여기서는 fontawesome을 사용할 예정
index.html
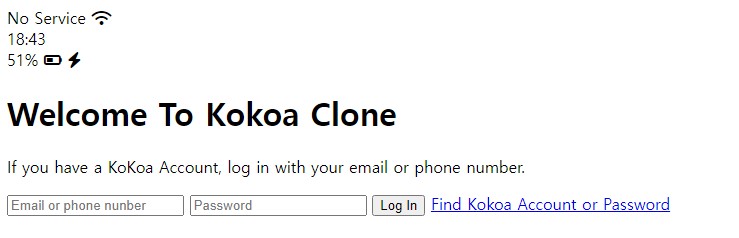
<body>
  <div class="status-bar">
    <div class="status-bar__column">
      <span>No Service</span>
      <i class="fa-solid fa-wifi"></i>
    </div>
    <div class="status-bar__column">
      <span>18:43</span>
    </div>
    <div class="status-bar__column">
      <span>51%</span>
      <i class="fa-solid fa-battery-half"></i>
      <i class="fa-sharp fa-solid fa-bolt"></i>
    </div>
  </div>
  <script
    src="https://kit.fontawesome.com/340f2fb345.js"
    crossorigin="anonymous"
  ></script>
</body>
결과
![]()
Header 및 Form
Header
<header calss="welcome-header">
  <h1 class="welcome-header__title">Welcome To Kokoa Clone</h1>
  <p class="welcome-header__text">
    If you have a KoKoa Account, log in with your email or phone number.
  </p>
</header>
Form
<form id="login-form">
  <input type="text" placeholder="Email or phone nunber" />
  <input type="password" placeholder="Password" />
  <input type="submit" value="Log In" />
  <a href="#">Find Kokoa Account or Password</a>
</form>
결과
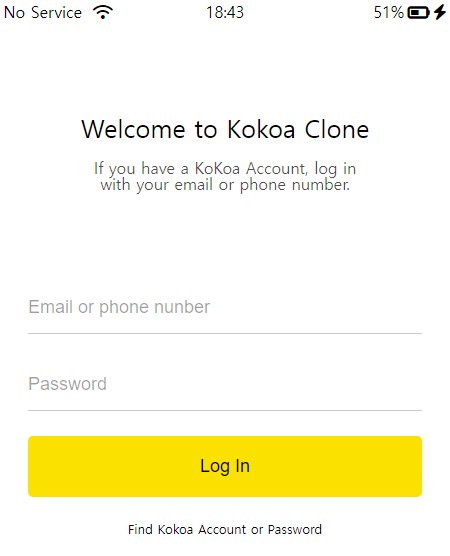
css 적용
<head>
  <link rel="stylesheet" href="css/style.css">
  ...
</head>
- style.css 파일을 생성 후 불러오기
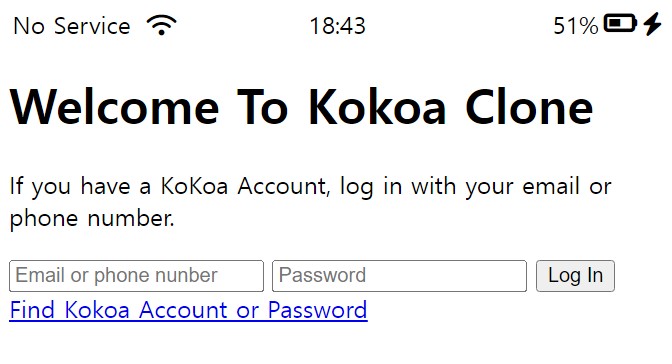
폰트 설정
body {
  font-family: system-ui, -apple-system, BlinkMacSystemFont, "Segoe UI", Roboto,
    Oxygen, Ubuntu, Cantarell, "Open Sans", "Helvetica Neue", sans-serif;
}
- 순서대로
sytem-ui,apple-system, … 순으로 적용할 수 없으면 다음 차선으로 적용됨 - 구글 폰트에서 폰트 적용도 가능
- 링크: https://fonts.google.com/about
시간 가운데 정렬
.status-bar {
  display: flex;
  justify-content: center;
}
.status-bar__column {
  width: 33%;
}
.status-bar__column:first-child span {
  margin-right: 5px;
}
.status-bar__column:nth-child(2) {
  display: flex;
  justify-content: center;
}
.status-bar__column:last-child {
  display: flex;
  justify-content: flex-end;
  align-items: center;
}
.status-bar__column .fa-battery-half {
  margin: 0px 3px;
}
.status-bar__column:nth-child(2): 2번째에 있는 시간을 가운데 정렬.status-bar__column:last-child: 우측에 있는 열을 우측으로 정렬
결과
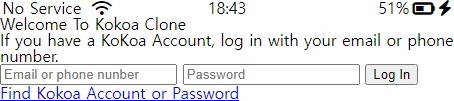
reset.css
- 브라우저에서 기본적으로 제공하는 글꼴, padding 등 default 설정 존재
- 브라우저에서 기본적으로 해주는 스타일이 있기 때문에 모든 것을 초기화하고 새로 설정하기 위해서는 reset.css 파일을 생성해 주어야 함
- reset.css 코드 검색해서 생성
- 링크: https://cssdeck.com/blog/scripts/eric-meyer-reset-css/
reset 적용 결과
색상 변수
:root {
  --yellow: #fae100;
}
--yellow라는 변수에 해당 색상 지정 가능
header 지정
.welcome-header {
  margin: 90px 0px;
  text-align: center;
  display: flex;
  flex-direction: column;
  align-items: center;
}
.welcome-header__title {
  margin-bottom: 20px;
  font-size: 25px;
}
.welcome-header__text {
  width: 60%;
  opacity: 0.7;
}
login-form 지정
#login-form {
  display: flex;
  flex-direction: column;
  margin: 0px 30px;
}
#login-form input {
  border: none;
  padding: 15px 0px;
  font-size: 18px;
  margin-bottom: 25px;
}
#login-form input:not([type="submit"]) {
  border-bottom: 1px solid rgba(0, 0, 0, 0.2);
  transition: border-color 0.3s ease-in-out;
}
#login-form input::placeholder {
  color: rgba(0, 0, 0, 0.4);
}
#login-form input:focus {
  border-color: var(--yellow);
}
#login-form input[type="submit"] {
  background-color: var(--yellow);
  cursor: pointer;
  padding: 20px 0px;
  border-radius: 5px;
}
#login-form a {
  text-align: center;
  text-decoration: none;
  color: inherit;
  font-size: 13px;
}
- #login-form input:not([type=”submit”]):
not을 이용해 예외 지정이 가능 ➡️submit타입이 아니라면 해당 스타일을 적용 - border-color: var(–yellow): 변수로 지정한 색상 사용
결과
[참조] 노마드코더 코코아톡 클론코딩
끝!