CSS 기초
스파르타 코딩 클럽 웹개발 종합반 수강 중
CSS란
CSS는 구역을 꾸며주는 역할을 한다.
<style>공간에 코드를 구현해서 꾸며준다.
예제
<head>
...
<style>
.mytitle{
color: red;
}
</style>
</head>
<body>
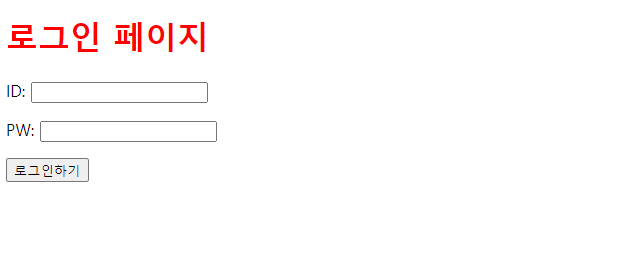
<h1 class="mytitle">로그인 페이지</h1>
...
</body>
<body> 구역에 클래스명을 정해주고 <head> 구역에서 style을 구현해 준다. 그 결과 로그인 페이지의 글씨가 빨간색으로 출력된다.
결과
자주 사용되는 CSS 속성
- 배경관련
- background-color
- background-image
- background-size
- 사이즈
- width
- height
- 폰트
- font-size
- font-weight
- font-famliy
- color
- 간격
- margin
- padding
예제
스파르타 코딩 클럽 웹개발 종합반 강의 자료 참조

<!DOCTYPE html>
<html lang="en">
<head>
    <meta charset="UTF-8">
    <title>로그인페이지</title>
    <style>
        .mytytle{
            width: 300px;
            height: 200px;

            color: white;

            text-align: center;

            background-image: url("https://www.ancient-origins.net/sites/default/files/field/image/Agesilaus-II-cover.jpg");
            background-size: cover;
            background-position: center;

            border-radius: 10px;

            padding-top: 40px;
        }
        .wrap{
            width: 300px;
            margin: auto;
        }
    </style>
</head>
<body>
    <div class="wrap">
        <div class="mytytle">
            <h1>로그인 페이지</h1>
            <h5>아이디, 비밀번호를 입력해주세요</h5>
        </div>
        <p>ID: <input type="text"/></p>
        <p>PW: <input type="text"/></p>
        <button>로그인하기</button>
    </div>
</body>
</html>
결과
margin vs padding
- margin: 바깥 여백
ex) 버튼의 위치 조정 - padding: 안쪽 여백
ex) 버튼의 크기 조정
폰트
예 : 구글 웹 폰트
설정
<head>
    <meta charset="UTF-8">
    <title>로그인페이지</title>
    <link href="https://fonts.googleapis.com/css2?family=Poor+Story&display=swap" rel="stylesheet">
    <style>
        *{
            font-family: 'Poor Story', cursive;
        }
        ...
    </style>
</head>
결과 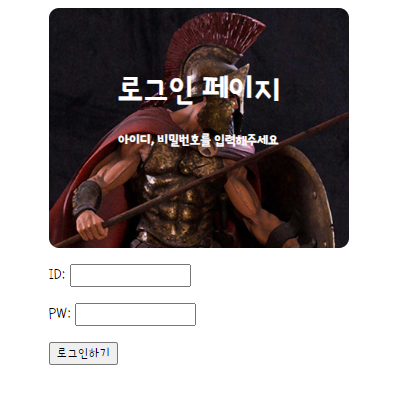
주석
주석은 원하는 라인에
ctrl+/를 입력해서 처리
파일 분리
style 정의한 파일을 따로 생성하고 다음과 같이 불러올 수 있다.
<link rel="stylesheet" type="text/css" href = "(css파일이름).css">
부트스트랩
부트스트랩이란 CSS를 미리 구현해서 모아둔 것
시작 템플릿
스파르타 코딩 클럽 웹개발 종합반 강의 자료 참조

<!doctype html>
<html lang="en">
<head>
    <meta charset="utf-8">
    <meta name="viewport" content="width=device-width, initial-scale=1, shrink-to-fit=no">
    <link href="https://cdn.jsdelivr.net/npm/bootstrap@5.0.2/dist/css/bootstrap.min.css" rel="stylesheet"
          integrity="sha384-EVSTQN3/azprG1Anm3QDgpJLIm9Nao0Yz1ztcQTwFspd3yD65VohhpuuCOmLASjC" crossorigin="anonymous">
    <script src="https://ajax.googleapis.com/ajax/libs/jquery/3.5.1/jquery.min.js"></script>
    <script src="https://cdn.jsdelivr.net/npm/bootstrap@5.0.2/dist/js/bootstrap.bundle.min.js"
            integrity="sha384-MrcW6ZMFYlzcLA8Nl+NtUVF0sA7MsXsP1UyJoMp4YLEuNSfAP+JcXn/tWtIaxVXM"
            crossorigin="anonymous"></script>
    <title>스파르타코딩클럽 | 부트스트랩 연습하기</title>
</head>
<body>
    <button type="button" class="btn btn-primary">버튼</button>
</body>
</html>
예 : 부트스트랩 컴포넌트 5.0
끝!